- Docs
- Build tests
- Automate
Automate
Automate is where you build test cases: you organise them in folders, record or add their steps, give them test data and try them with a dry run. Pipelines in Schedule then run them and keep the results.
In short
On this page you can
- Create test cases and templates and organise them in folders and modules.
- Record steps in your app, or add them from the toolbar one by one.
- Feed steps with variables, data sources and datasets.
- Try a test case with a Dry Run and read its live log.
- Let AI write steps from a prompt or expand a case into edge cases.
How to use it
- Click New Test Case in the tree and type a name at the top.
- Pick the environment and start page, then click Record or add steps from the toolbar.
- Select each step and check its values in the right panel.
- Click Save, then Dry Run until the run is green.
- Add the test case to a pipeline in Schedule so its runs are reported.
At a glance
- Where
- Main menu › Automate, the third item. One screen with three panels: test case tree, editor, details.
- Who
- Every project member can create and edit. Archiving other people’s work, modules and Delete for good need an Admin.
- You need
- Web: the browser extension and a start page URL. Mobile and desktop: a running agent. Actions from Discover help but are not required.
- Time
- A recorded five-step test takes a few minutes, including the first dry run.
- Produces
- Test cases and templates with ordered steps, each step bound to an action, plus the variables the steps share.
- Used by
- Schedule (pipelines run test cases), Report, Analyze (requirement links), Maintenance (auto-heal reviews) and AI assistants through MCP.
- Project types
- WEB: Record through the extension, start page URL per environment, Run on Server or Run on your Agent. MOBILE: Record opens the Appium inspector, dry run on a local device or Device Farm. DESKTOP: Record opens the desktop inspector, the test targets a desktop application and runs on an agent on Windows or macOS.
Start from your question#
I want to…
Something is wrong
Where Automate fits#
The main menu is the order of work. Automate turns what Discover and Analyze know about your app into runnable test cases.
- 1DiscoverPages, controls, rules
- 2AnalyzeRequirements
- 3AutomateTest cases and steps
- 4SchedulePipelines
- 5ReportResults
- 6MaintenanceHeal and review
You do not have to finish Discover first. Recording in Automate creates the actions its steps need. What Discover adds is context: page purposes, notes and the App Map, which the AI features in Automate read.
Why build tests here#
- One control, many tests. A step points at an action from Discover by its ID. Fix a locator once and every test that uses it is fixed.
- Web, mobile, desktop, API, database, mail and messaging in one scenario. A single test case can log in on the web, call an API, check a database row and read an OTP from a mailbox.
- Templates instead of copy and paste. A login written once as a template is a live reference in every test that uses it.
- Data without code. Steps read
{{variables}}from earlier steps, data sources and datasets; a pipeline can run the same test once per data row. - Fast feedback. A dry run shows every step live with a screenshot, without filling up your reports.
The building blocks#
- Test case
- An ordered list of steps that runs on its own and produces a report when a pipeline runs it.
- Template
- A test case marked as a reusable block of steps. Other test cases add it as one step. Editing the template changes every test that uses it. See Test case or template.
- Folder and module
- Folders organise the tree. Every folder directly under the project root is a module: it has a twin folder in Analyze and a module in the App Map. See Folders and modules.
- Step
- One thing the test does: click, type, call an API, assert, run code, ask the AI. Most steps are bound to an action; templates are steps that call another test case.
- Action
- A control on a page with its locators, shared across test cases. Managed in Discover › Action List.
- Parameter
- A value a step uses (the text to type, the expected result) or produces (an output variable). Shown in the right panel’s Parameters List.
- Variable
- A named value written as
{{name}}. Earlier steps, data sources, global parameters and datasets provide them. See Variables and test data. - Environment
- DEV, TEST or PRP. Each start page URL has an address per environment; the test case’s environment decides which one opens.
- Dry run
- A trial run started from the editor, with a live log and no report. See Dry run and live log.
- Archive
- Where deleted test cases and folders go. Restoring puts them back. See Archive and restore.
The screen#
Automate has three panels. Click a test case in the tree to open it in the editor; the details open on the right.
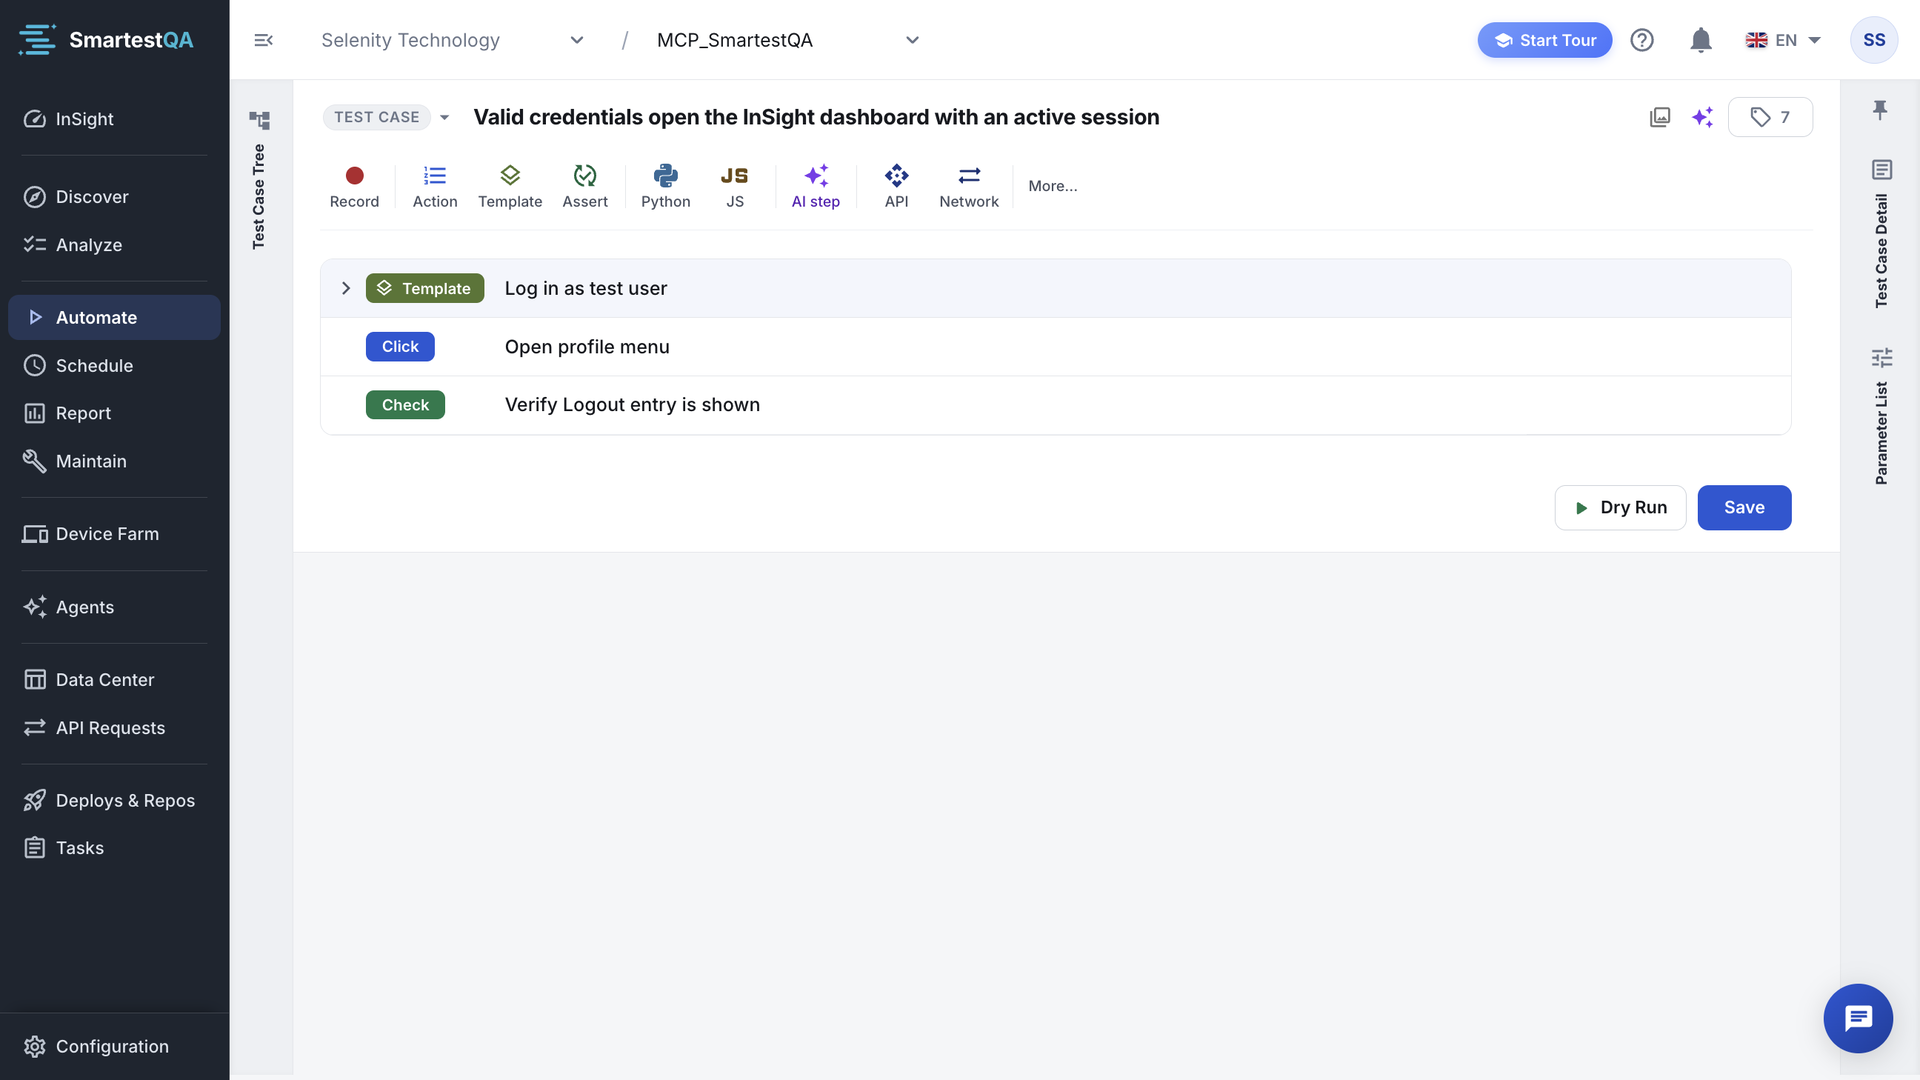
| Panel | What is there | Details |
|---|---|---|
| Test case tree (left) | New Test Case, More (Create Folder, New Manuel Case, Generate Test Cases with AI), the filter, folders, test cases with their last-run icon, and the Archive at the bottom. | Test cases and folders |
| Editor (centre) | Test case or template chip, the name, Screenshots, AI Assistant; the step toolbar; the step list; Dry Run and Save. | Edit steps and save, Record and add steps |
| Details (right) | Test Case Detail (description, environment and start page, tags, pipelines, recent runs, requirements, history, comments) and Parameters List for the selected step. | Test Case Detail, Variables and test data |
Click a folder instead of a test case and the editor shows the Folder summary: pass and fail counts, condition coverage and trust warnings. With nothing selected it shows the Project summary. See Folder summary.
On screens narrower than 1200 pixels the tree becomes an overlay you open from the left rail. After a page refresh the test case you had open opens again.
Before you start#
| Project type | You need | Check it |
|---|---|---|
| WEB | The SmartestQA extension in Chrome or Edge for recording; a start page URL with an address for the environment you test; a test user. | The environment chip next to the start page shows your environment and is not greyed out. See Add a start page URL. |
| MOBILE | The agent running on the computer with the device or emulator and Appium Server, or a SmartTest Device Farm device; the app configured in Mobile Config. | The host is green in Device Farm › Test Agents. See Mobile and desktop apps. |
| DESKTOP | The agent running on the Windows or macOS computer with the application; a desktop application configured as default. | The Target Application in Test Case Detail shows your app. |
To use the AI features, an admin turns on Enable AI and AI Document Analysis in Project Panel › AI Options. See Turn on AI.
Ways to build a test case#
| Method | Best when | You get |
|---|---|---|
| Record | You know the flow and can click through it | Steps and the actions they use, in the order you did them |
| Add steps from the toolbar | The actions exist already, or you need API, database, mail, code or assertion steps | Exactly the steps you choose |
| Template | A flow such as login repeats in many tests | One step that runs the whole template |
| Generate from Prompt | You can describe the flow in a sentence and the actions are recorded | A full step list built from existing actions, for you to review |
| Generate Test Cases with AI | You want first coverage of a module quickly | A new folder with several test cases |
| Expand Scenarios | A happy path passes and you need negative and edge cases | 2–4 variations next to the original |
| Analyze | You start from requirements documents | Requirements with linked test cases |
| AI assistant through MCP | Developers working from source code | The assistant writes steps, dry-runs them and fixes them until green |
How a test case runs#
The same steps run in three situations. Only pipeline runs are kept.
| Dry run | Pipeline run | |
|---|---|---|
| Started from | Dry Run in the editor | A pipeline in Schedule: by hand, on a timer or from CI |
| Where it runs | On the server or your own agent | On the server, an agent or a runner |
| Report and last-run icon | No | Yes |
| Test data rows | First row only | One run per row when the pipeline asks for it (data loop) |
An agent is a place where a run executes, not a separate mode. Full comparison: Run modes.
Best practices#
Do
- Keep one test case to one user goal, 5 to 20 steps.
- End every test case with a proof step: an assertion, a visibility check with text, or an API extraction you check.
- Put login and other repeated flows in templates.
- Use
{{variables}}and datasets for data that changes. - Dry run after every few edits; save first.
- Organise folders by business area; the top level becomes your modules.
- Record on TEST with a test user and test data.
Don’t
- Rename a step casually: it renames the shared action in every test.
- Use Generate Steps on a test case whose steps you want to keep.
- Build long chains of AI steps where a normal action would do: they are slower and not deterministic.
- Leave inactive steps lying around for months; remove them.
- Edit the same test case with a colleague at the same time: the last save wins.
- Type real passwords into step values; use a data source.
In this section#
The step types themselves, with every parameter, are described in the step reference.
Create test cases and templates, organise them in folders and modules, find them, and archive or restore them.
AutomateRecord and add stepsRecord a flow in a web, mobile or desktop app, or add steps one by one from the toolbar, including templates.
AutomateEdit steps and saveThe editor screen, reordering and switching steps off, replacing and editing actions, Test Case Detail, and what Save checks.
AutomateVariables and test dataWrite {{variables}}, pass values between steps, use data sources and datasets, and run one test case once per data row.
AutomateDry run and live logStart a dry run on the server, your agent or a device, read the live log, and see how a dry run differs from a pipeline run.
AutomateAI in AutomateGenerate steps from a prompt, expand a case into negative and edge cases, generate test cases for a module, AI descriptions, AI steps and AI Analyze.
AutomateHow the numbers workFormulas and worked examples for the status icon, template badge, usage chip, folder summary, live-log progress and recent runs.
AutomateTroubleshootingEvery Automate message and symptom, with why it happens, what to check and how to fix it.
AutomateFAQ, MCP & limitsQuestions and answers, how AI assistants build test cases through MCP, and the module’s limits.
Related#
- Actions: the controls and locators that steps point at.
- Link test cases: connect test cases to requirements in Analyze.
- Data Source: keys, datasets and connections that steps read.
- Build a pipeline: run test cases on demand or on a schedule.
- Report: results of pipeline runs.
- Auto-heal reviews: repaired locators to approve.
Didn’t find your answer?Write to support with your project name and what you see on screen.
info@smartestqa.ai